BrickVent Features
About the BrickVent Moisture Control System
Moisture management is an important issue in all building design, especially the exterior cladding, i.e. the brick veneer. In masonry veneer construction, good design includes a space or “cavity” being maintained between the exterior masonry wall and the underlying structure. The BrickVent Moisture Control System works in conjunction with this cavity to provide superior drainage while also functioning as a conduit for airflow; thereby greatly increasing the drying capabilities of the exterior masonry wall and cavity behind it. This airflow is what sets BrickVent apart from other moisture control systems. For superior cavity or rain screen wall performance, “Breathe easy with BrickVent”


BrickVent is Better: Weeps AND Vents
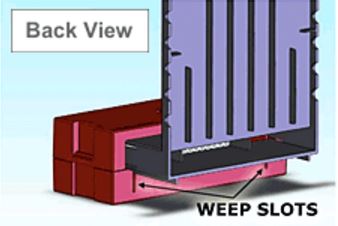
BrickVent will weep away excessive moisture. Weep slots (see Figure 1) on the back of the BrickVent allow excessive moisture to run in the back and out the exterior face of the BrickVent due to the interior floor of the BrickVent being sloped to direct the water to and out the front of the brick.
More importantly, the BrickVent product will provide ventilation to the cavity between the masonry veneer and the underlying structure, which typically has a moisture resistant wrap.

Adaptable by Design
The Adjustable Vertical Backplate Vent is a versatile and essential component designed to accommodate varying cavity widths ranging from 3/8” to 2” that can exist between the masonry veneer and the structural face beneath it. This adaptability is crucial for ensuring a proper fit and optimal functionality in diverse construction scenarios. The vent’s design allows it to adjust seamlessly to the specific spacing requirements of a building, providing effective moisture management and airflow regardless of the gap size. By allowing for such customization, the vent ensures that the installation process is both straightforward and efficient, reducing potential complications and enhancing the overall structural integrity and moisture resistance of the building envelope. This feature is particularly valuable in retrofit projects as well as new construction, where uniform cavity dimensions cannot always be guaranteed.

Durable Good Looks
BrickVents blend with your brick. The BrickVent units don’t call attention to themselves; because they are made of plastic with color additives throughout, so that the units blend in with the most popular brick colors. Custom colors are available at additional cost.
BrickVents stand up to the weather. Also, like outdoor furniture, the plastic is made for exterior use with UV inhibitors to prevent it from breaking down from exposure to the sun and weather.
BrickVents don’t clog. The BrickVent is designed with a trash mortar deflector and an adjustable backplate vent to account for the trash mortar and a gap that can vary from 3/8” to 2” between the masonry curtain and the wood frame structure. So, for new construction the BrickVent will provide superior ventilation and the commonly added trash mortar netting is not needed. For remediation on an existing structure, the vertical backplate vent is not needed, only the brick portion of the BrickVent.

Simple Setup & Installation
Just 6 Steps! Download the instruction sheet.
- 1
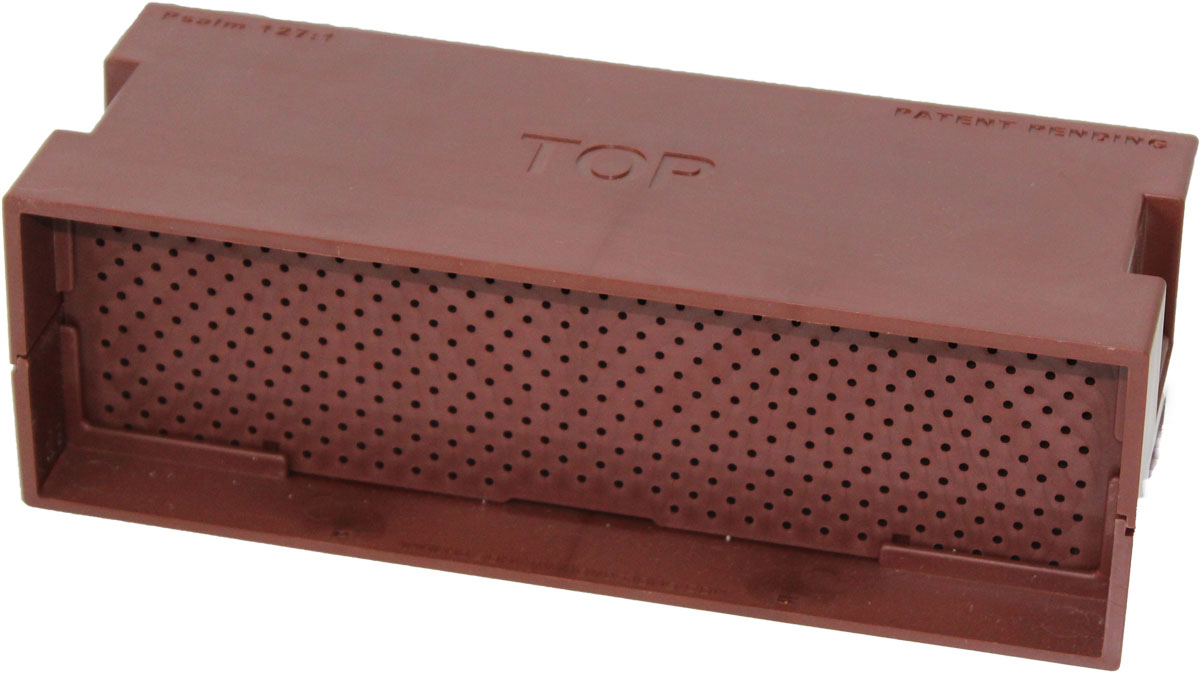
The BrickVent units are packaged as two separate pieces. They are the lower vent and the backplate. To assemble the units, press in the tabs on either side of the backplate, then slide and snap into lower vent. It may be necessary to snap one side at a time.
- 2
Lay BrickVent units in first or second course flush with outside of masonry wall.
- 3
Space BrickVent units every 64” (8 standard bricks between). Center one BrickVent unit in walls less than 5’ wide.
- 4
Adjust backplate so that it rests against exterior sheathing of house. Nail to house thru provided nail flange.
- 5
Place weep holes or tubes between BrickVent units to satisfy local code.
- 6
To protect from dirt and falling mortar, leave cardboard protectors in front of BrickVent units until final clean-up.
*Although BrickVent comes in three standard colors, matching almost any masonry wall, the vents may be painted using any paint designed for use on plastics.

Air Flow Despite Debris
BrickVent’s innovative design integrates a mortar deflector and an adjustable backplate vent to effectively manage common issues in masonry construction. Traditional weep products often get clogged by trash mortar that falls into the cavity during wall construction, akin to a plugged drinking straw. Attempts to prevent this with loose fiber netting have proven problematic; incorrect installation or mismatched sizes can still allow mortar to block airflow, while too small a gap can deform the brickwork. BrickVent addresses these challenges by facilitating optimal air flow and preventing mortar buildup, eliminating the need for additional netting. For new constructions, BrickVent offers superior ventilation due to its unique features, and for remedial work on existing structures, only the brick portion is necessary, simplifying the installation process and maintaining structural integrity and appearance.

Prevent Pests
Pest Prevention
The Pest Prevention Screen prevents unwanted insects or small rodents from entering the space between the masonry veneer and the underlying face of the structure, without hampering the air flow of the unit.
Dimensions of the BrickVent
- BrickVent Brick is 7 ¾” long x 2 9/16” high x 3” wideVertical Backplate
- Vent is 3/8” thick x 12 ½” high x 6 5/8” wide with a 8 3/8” wide and 1 ½” tall nail strip
The BrickVent is designed with a trash mortar deflector and an adjustable backplate vent to account for the trash mortar and a gap that can vary from 3/8” to 2” between the masonry curtain and the wood frame structure. So, for new construction the BrickVent will provide superior ventilation and the trash mortar netting is not needed. For remediation on an existing structure, the vertical backplate vent is not needed, only the brick portion of the BrickVent.

